How many times have you had an amazing design idea, spent hours working on it, and ended up with artwork that is too blurry to be used or with colours that came out wrong once printed?
Whether you’re a small business owner with a limited advertising budget or need an advert for your local club or charity, there are times you may have to design your own marketing material without relying on the services of a professional designer. Thanks to free online design programs like Canva, you don’t need to have special design skills or invest in expensive software to create marketing material but you have to use the right settings to make print-ready designs in Canva.
You can use Canva for printing and get great results if you follow a few simple steps:
- Make it bigger (but keep the same proportions)
- Start with high-resolution images
- Use a CMYK colour picker
- Output to the correct format
Canva is a great tool if you want to create images to display on a computer or mobile device but you don’t always get the same results when using it for printing.
That does not mean it can’t be used for printed projects but you will have to tweak things a bit to set yourself up for success.
As publisher of a printed directory containing adverts for small businesses, I often receive artwork created by busy people inexperienced in creating print-ready files who get so frustrated when they are unable to fix the problem when things go wrong that they consider giving up completely.
Does this sound familiar? Read on to find out how you can use Canva and see practical examples to help you make print-ready designs and achieve great results.
Make it bigger (but keep the same proportions)
Canva includes many useful templates but using them will limit you to the size that the template was originally created. This may be good enough if you are making an image for a social media post, but if you place an advert in a printed publication, you have to provide the artwork to exact specifications.
It is easy to set up a custom size in Canva to specify the correct dimensions but it will not prevent you from ending up with a blurry image.
Example: You need an advert to fit 1/8th of an A5 page. The exact measurements are 63 mm wide by 46 mm high.

Image A: The custom size function in Canva was used to design the advert to the exact specifications needed by the publisher (63mm x 46mm). It was downloaded as a PNG image which was the option with the highest possible resolution. The final product is blurry and will not provide a quality print.
Image B: The advert was custom-sized to 252 mm wide by 184mm high – exactly 4 times bigger than the required specifications but with similar proportions. The design was downloaded as a PNG. The end product is not blurry but it is too big to fit the required size. This will not be a problem for the publishers because they still need to import the image into their document where it can be manipulated by pulling it smaller without losing quality.
Start with high-resolution images
The minimum size that artwork can be for quality printing is a resolution of at least 300 DPI. What does this mean?
DPI, or dots per inch, is used to measure the resolution of images on monitors and in print. It refers to the actual number of printed dots contained in one linear inch. The DPI of an image is directly responsible for print quality. The higher the DPI, the more detail is visible, and the better the print quality will be.

If you use an image in your design with a low DPI it doesn’t matter what you do to improve the quality during your design process, the end product will still be blurry.
Free images obtained from the internet often have a low DPI but this is not always apparent at first glance by looking at it on a screen. The reason for this is that most monitors display a default DPI of 72 or 96 which will allow a low DPI image to look crisp on a screen but blurry when printed.
Your monitor is designed to show a low DPI and can’t display a 300 DPI image as its actual size. When viewed at 100% a 300 DPI image will look much larger in physical dimensions on a screen than its printed version because the pixels on the screen takes up more physical space than the dots do on paper.
Looking at the screen size of your image can be an indication of the DPI but how can you be sure? If you save the image you can look up the DPI by right-clicking on the image and selecting the ‘properties’ tab. Click ‘details’ to see the exact DPI of the image.

Images with a resolution below 300 DPI will result in a final product that is too blurry to use.
Use a CMYK colour picker
Picking your favourite colour for your artwork is easy with Canva’s colour docker but if you are trying to match a company’s corporate colours or designing a logo that must have consistent colours across all devices and in different printed media it will be more of a challenge.
Example: Design a logo in blue and pink pastel tones that will look similar across different media.

In the above example, the difference in colour is clearly visible. The colour scheme ranges from blue and pink to green and red which is not consistent. One of the reasons for the difference is because colour is created and displayed in a different way on screens than printers.
The colour on a computer monitor is created in the RGB color model. It displays colour as hundreds of pixels that light up in different intensities based on the colour of the pixel as a combination of red, green, and blue light. Black represents the absence of light and is used as the base colour to which different intensities of red, green, or blue light is added until you get white.
Printers use CMYK – a combination of cyan, magenta, yellow, and black ink pigments that absorbs light and is added to white as a base to get darker colours until you get black. This makes it practically impossible for a printing press to exactly reproduce colours as you see it on your monitor.

The colour model used in your design is not the only thing that affects the colour of the final product. You can set up five computers with five separate printers and get a different result on each monitor and printer because the colour that’s displayed depends on the process the individual device uses to detect and reproduce the colour.
So how do you get the colour right and make print-ready designs in Canva? You may not be able to ever get it 100% right but if you use an online CMYK colour picker to choose your colours you’ll get close enough that you won’t see a big difference and you’ll be able to create artwork in Canva that is suitable for printing.
There are many free CMYK colour pickers available. The one used in the example is from ginifab.com and allows you to upload your own image if you do not see your exact colour on the supplied CMYK docker.
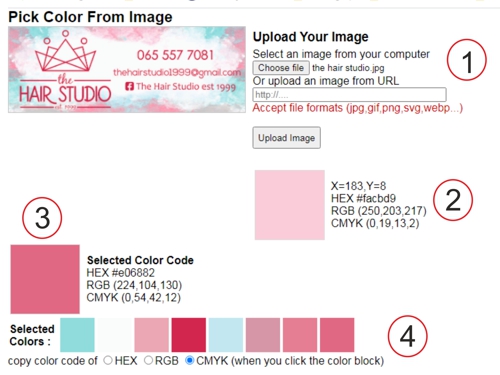
You can copy the HEX colour to your clipboard and use it in Canva. The HEX code is a 6-digit combination of numbers and letters used to represent RGB colours.

Your monitor will still display the image in RGB but the mathematical number used to create your colour will be based on the CMYK model that you chose in the CMYK colour picker.
Make a note of the CMYK code. If you provide the publishers with the CMYK colour code they will be able to set up their printing press to match your screen colour as closely as possible.
Output to the correct format
Downloading your image as a PDF for print is the only way you can get a 300 dpi image directly from Canva and because most publishers of printed material will require you to supply your artwork as a PDF, this option is perfect. Make sure to download the image as a PDF for print and not a standard PDF to get a 300 dpi PDF that will be suitable to use.
So what do you do if you want a high quality JPEG or PNG file instead of a PDF?
According to Canva, you can download your image as a PNG if you want a high-quality image but..you’ve guessed right: your image will download as 96 DPI.
If you want your Canva image to be a JPEG or PNG file with a resolution of 300 DPI, you will have to use an online converter that will give you the option to specify your preferred dpi output quality.
If you import your PDF into the online converter and specify that you require the output to be 300 DPI, you will get an image that is ready for print.
You can use Canva for print designs and get great results.
An online design editor that was created to help you make images for a screen will not be the software of choice for a graphic designer working in a print environment. That doesn’t mean you can’t use it for print or that you need to pull the hair out of your head in frustration during your efforts.
If you use the correct settings when you create your size, colours and output format, you can make print-ready designs with Canva and with access to great artwork in the template library to inspire your ideas you do not need a professional designer to get quality printed marketing material.